Pages

Wednesday, October 31, 2012

Headbands!

I love making and wearing headbands. In the past year, I have taught myself how to make several different kinds. They are super easy to make and for the price of one headband on Etsy or in stores I can make 5 or 6. Most of the time I use fabric to make my headbands but I wanted to try ribbon for this one to make it shiny! 

Supplies: Hot glue gun
                 Ribbon
                 Small beads 
                 Tacky glue or Fabric Fusion
                  Elastic headband 


Step One: Make a little ball of ribbon and glue it. To make my center, I twist and tie then glue the end of my ribbon.


Step Two: Fold or twist your ribbon and glue it in place every so often. It's kind of hard to describe this part. I figured it out with practice. I hope to get a video made to better explain this step. First I need to get more ribbon. 


Step Three: Once your flower is the size you would like it glue the end so it is secure and then cut off the excess ribbon. Be sure to leave a little "tail". It will be used in just a bit!


Step Four: Some people use actual elastic and sew their own headband. I on the other hand use already made headbands. They can be bought in all different colors and it saves me a step. I also think that these stay together better. Place a strip of hot glue on the bottom (backside) of your flower and set the headband in the glue. Be sure not to burn your fingers. (By now, my fingers are used to it. I usually end up gluing my hand to what ever I am working on...) Next place another bit of glue (more than the first time) on top of the headband. Press the tail on top of the glue before it hardens! Again, try not to burn your hands. 


Your flower should now look like this. 


Step Five: Place your flowers in which ever way you want. You can use as many or as little flowers as you want. I happen to like three medium size ones. 


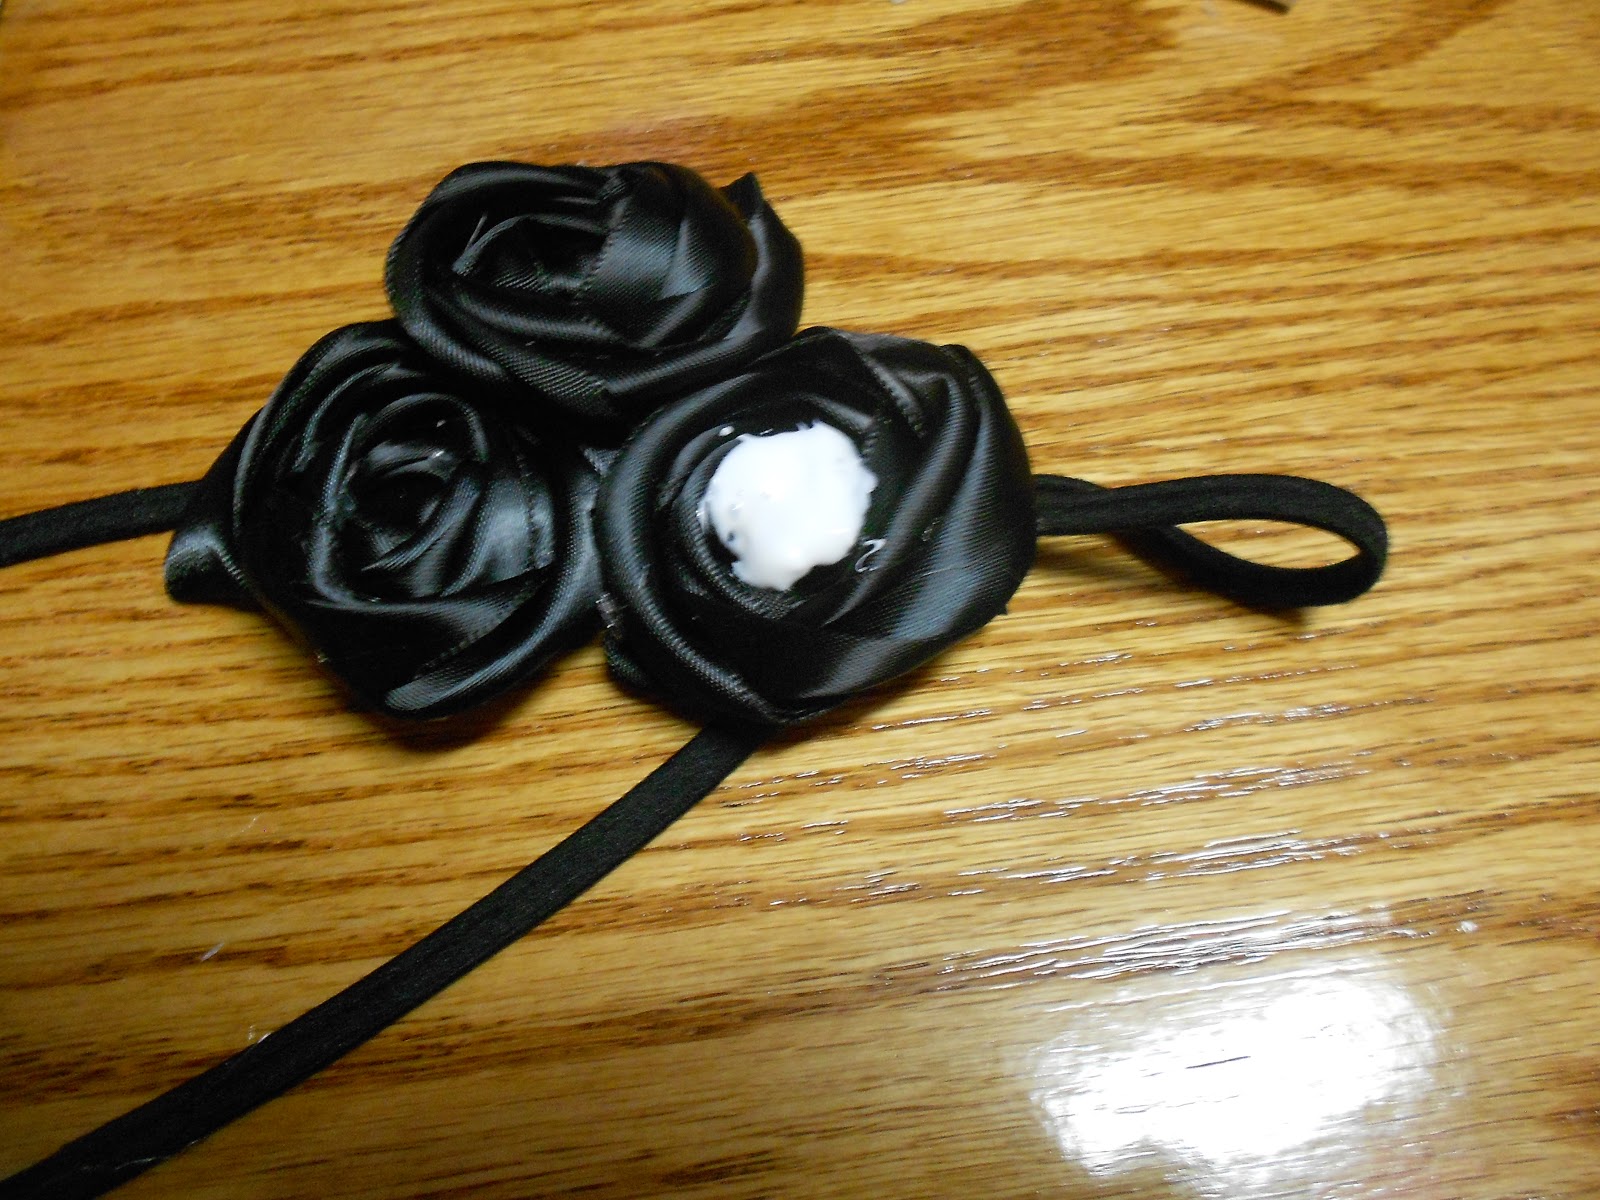
Step Six: Put tacky glue in the center of your flowers. 


Step Seven: Sprinkle your beads in the glue. You may want to push them into it so that they actually stick to the glue. The glue will dry clear. Let it dry, when it is all dry you can add more beads if you feel like they are needed. 


I think that I will be making some Christmas themed ones... If you have any questions feel free to email or leave a comment. I will be happy to help you! I'd love to see your headband creations! Happy crafting :) 
                                -Katelyn


Monday, October 29, 2012

Name Vase

I initially had a completely different idea about what I wanted to do with the Dollar Tree vases that I picked up over the weekend. But I decided to keep that craft in my pocket until Christmas rolls around! My mom love the rust color that she picked out for our house when we re-did everything in it. JoAnn's lacked the rust color puff paint that I needed so she's getting bronze, oolalala. 

Supplies: Scrapbook paper
                 Puff paint
                 Glass Vase
                 Mod Podge 

First paint a few layers (I did 4) of Mod Podge onto the scrapbook paper. This will help stiffen the paper and give it a glossy look. It will also help give it some water proof if you decide to use it as an actual vase. After the Mod Podge dried, I wrote out my last name onto the paper. You can put what ever design you want on it. 


Next trace your design with the puff paint. You will be able to touch it up once it dries. 

After the puff paint is dry, paint the outside of the vase with Mod Podge. Wrap the scrapbook paper around the vase. To keep it on there until the Mod Podge dries, tape the seam. It should come off because the Mod Podge makes the paper slick

When it's all dry, you will have something like this. Pretty cool right?! I want to make another one with a paisley design or a feather or something like that. 


Sunday, October 28, 2012

If I Was A Superhero...

Seriously, if I was a superhero this would be me. It is a problem that I have yet to over come. You would be amazed by all of my insane fears and phobias and how fast I can jump to the worst possible conclusion.  Follow Me on Pinterest

Wednesday, October 24, 2012

Laundry: College Style

Everyone's has to do laundry in college. Unless you are one of those kids who goes home or visit Grandma every weekend and Mom or Grandma does your laundry. In that case, that's cheating. I will admit that I did turn my laundry blue one time. That was because I bought new jeans with a lot of indigo dye in them and I kind of forgot about it. But I now have a lovely shade of blue tank top! Anyways, we (Anna and I) do our laundry a little different than the average student. I do laundry once a week for 24 weeks during the school year. If I used two laundry machines and two dryers per week plus if I wash my sheets every two weeks that is almost 110 dollars per year on laundry. I don't know about, but I don't like that. Also the dryers here either shrink your clothes or don't dry them. If they don't get dry then I have to pay for another cycle, only increasing my laundry budget. So we came up with a new system! Let me introduce you to my system. :)


Behold! My magic laundry supplies! What we've got here is a rying rack, a hamper (from Target), and soap. I love my hamper. I got it at Target last year and it is perfect. It works as a hamper and a laundry basket. It's also sturdy and wont rip, unlike those cheap netted ones that they put in the college supply section of stores. When I take laundry home I have a few of those cheap net bags to take it home because they hold more laundry - there for I have enough clothing to last me three weeks so I can take it all home on break! Now, I bet you are thinking why in the world does she have a drying rack? Well remember my story about the dryers and the price? I decided that it wasn't worth it. I hang all of my clothes up. They last longer and it saves me money. I used to hang them up like the pictures below on my bed. But then on Thanksgiving break last year Mom and I picked this one up at Walmart for $19.99. It's big enough for my weekly load. Target has a similar one, but it is smaller and not as sturdy. We also have a rope that we tie between the lofts to hang up clothes that don't fit. I borrow Anna's when I wash my sheets so that they can be aired out more and dry faster. It usually takes about a day to dry unless we have the heat on, then it takes less time. 


My now more sophisticated way. :P
As for my soaps, that's a process. I have two different stain removers. Last year I used an OxiClean one and it didn't work. But these do perfectly fine! Our washers smell musty sometimes and that transfers to my clothes. They are used by hundreds of students so it is understandable. Enter the Downy Unstopables. I love these little things. I add about a fourth to half of a lid full to each load and it takes away the musty smell. It also makes my laundry smell great! As for softener and detergent, I just use plain old Downy and Tide. 

These are Tide bags. They can be found in the laundry isle of most stores (I got mine at Target and as a graduation gift from my cousin). They are seriously life savers. The bigger bag is for blouses and sweaters. I put my really nice shirts and cardigans in it. It saves them from being ruined in the wash and me having to do a separate load for them. The smaller one is for undergarments (coughcoughmybras). This also saves them and saves me from awkwardly washing them in the laundry sink that is full of germs and dirt and hasn't been cleaned in about five years. It fits two bras. Check them out, I love them.
I'm not going to tell you how to actually do your laundry. But I will tell you the following. Separate jeans, sweatpants, shorts, ect. from shirts, blouses, tanktops, ect. This will save your clothes! Also do not wash on warm. Wash on cold. This way you can mix colors. If you are hesitant about mixing colors, try a color guard sheet. I haven'y had a problem yet (except for the jeans... but it hasn't happened since). Untangle your clothes from each other, don't just throw them in a ball into the washer, they won't get clean. 

That's about all of my laundry knowledge. I know that hanging your clothes in your dorm or apartment seems crazy, but it has saved me a lot of money and it works better then drying my clothes on "medium" for two hours so they don't shrink. Happy Laundering! 
                                 -Katelyn


Glitter Web

Watch out, more glitter ahead!


Last week I had a 50% off coupon for JoAnn Fabrics. It was my lucky break because I was in desperate need of hot glue sticks. I am terribly frugal when it comes to buying those because I really don't think they are worth nine dollars. I picked up a 100 count bag for $4.73. Pretty good right! Today I was enlightened to make something with them. 
Supplies: 
Glitter, hot glue sticks, hot glue gun, tinfoil or wax paper


 Because hot glue sticks to tinfoil and dries amazingly fast, I decided to glitter before I glued. I sprinkled it on the tinfoil as a base, kinda like PAM cooking spray. 

Make a dot in the middle and then make an x and then another x with the hot glue. Just like you would cut a pizza or draw a snowflake. 

 Next I made circles around my web lines to make a web. Pretty simple :)
So pretty! It has these cool stringy pieces of glue that are stuck to it. They have glitter on them too and it makes the web look more webby. I really wish you could see them better in the picture! Have fun making these!
                                   -Katelyn 


Monday, October 22, 2012

Just A Thought

I love giveaways. Who doesn't love giveaways?! I'd like to know if anyone is interested in participating in one here on Sweet Potato Pie. So if you'd like to win something free, please let me know in the comment section! The more interest in the giveaway, the bigger the prize. So let me know! 
                              -Katelyn 

Glitter Pumpkins

Beware, this craft contains glitter. 


My pumpkins were just sitting there, looking at me all orange and plain. They were begging for glitter. The wanted my to do it. So because I am a nice person, I glittered them. They look so pretty now. :) Here's the breakdown: 

Supplies:
Glitter (duh)
Glue
Paper
Sponge or Paint Brush
So for pumpkin A I wanted to do a drippy spiderweb. I used tacky glue because it is "stronger" so to speak. It has the perfect amount of run in it for this project. 
Now pour that glitter on!!!!
Isn't it beautiful! (See that mass of glitter underneath of it? Yeah I spilled it by accident. No worries it was on paper... This time.)
Now for pumpkin B. It is my favorite! 
Take pumpkin B and put some glue on it. Then spread the glue around with a sponge or brush. I used one of those foam makeup brushed because that happened to be what I had on hand. I wanted to go for an ombre pumpkin but I didn't have different shades of pink glitter so it was glittered in silver, pink, and black. First I poured silver glitter on just the bottom of the pumpkin. I didn't make a perfect section because that would be to fussy. 

Then I poured pink glitter all over it. (Pink glitter is my favorite.) At this point I was just going to put silver glitter on the stem, but then this happened. 
Miranda (wearing her Mexican cape and doing the Mexican Cape dance): Put black glitter on it.
Me: I don't have any.
Miranda: Oh well I have some. Here! (This is when she started doing the Mexican cape dance...)
(I'm quite enchanted by the silver glitter I spilled) So I put glue on the stem and the top of the pumpkin and poured black glitter on it.   


The final product. I'm in love. I wish I could keep them forever! (Please ignore my messy background.)
Have fun with you pumpkin projects this year. I'd love to see them!
              - Katelyn


Follow Me on Pinterest